Showing posts with label Indian food. Show all posts

Sunday, May 1, 2016

Daal Palak


There are some dishes we all used to run away from as kids. We would hold fights, make faces, put up arguments and when none of it works we would literally beg mom in order to escape eating those "healthy" dishes. Do you have some such dishes coming to your mind? The recipe for the dish that I am sharing here today is one such recipe I used to shrug seeing in front of me most of my childhood and teenage life. Daal Palak!!


Strange enough, but it is the same dish I can't wait to lick off my plate once I am done cooking it. Yes it is funny that the same dish my mother used to make and as a child/teen I would be hell bent on not eating, that I now yearn for and find perfect to eat with hot and fluffy phulkas or chapatti for lunch. Do you also find yourself in the same spot as I do? :-)


Another gem of a dish from North Indian cuisine, Daal Palak is a powerhouse of nutrients such as iron, fibre, protein and vitamins. The green colour of this curry/gravy is proof enough to show how healthy and nutritious this dish is! Many people do not like spinach especially children but if you cook spinach with moong daal or yellow lentils and masoor daal or pink lentils, it will be a creamy green sauce/curry that everyone will want to lick their fingers off! You can adjust the chili if making for children!


I have learnt this recipe from my mother and over the years have developed a knack of putting it together without much effort on the table in under 30 minutes. This recipe is healthy and easy to make and requires very little ingredients. It has the subtle rich aroma of ghee or clarified butter, tiny bits of soft onions and a pungent flavour of garlic and creamy texture of the lentils and spinach.


Prepping Time: 10 min
Cooking Time: 20 min
Difficulty Level: Easy


Ingredients:

Spinach leaves, 1 bunch, washed
Moong Daal, 2 tbsp, washed
Masoor Daal, 2 tbsp, washed
2-3 garlic cloves, finely chopped
Onion, 1, finely chopped
Tomato, 1, grind to paste
4-5 green chilies
4 tbsp ghee
1 cup water
turmeric powder 1 tsp
red chili powder 1 tsp
salt, to taste

Method:


1) Start by washing spinach leaves in a colander. And wash the daal too.


2) In a pressure cooker put the washed spinach leaves, daal, 1-2 green chilies (whole), 1-2 cloves of garlic, 1 cup water along with some salt and 1/2 tsp turmeric powder. Put the lid on and pressure cook until it whistles. Turn off the gas and let the steam escape.


3) Meanwhile, in a wok put ghee and add chopped garlic and let it sizzle until the raw smell disappears.


4) Now put in the chopped onions.


5) Until the onions brown, grind 1-2 tomatoes and 2 green chilies with a blender.


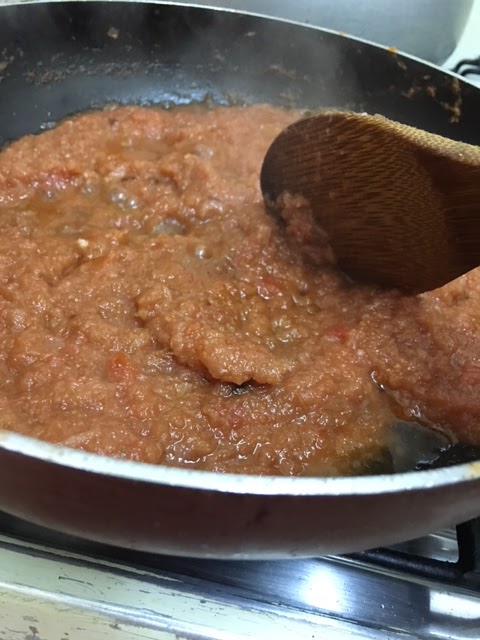
6) Once the onions seem brown add in the tomato-green chili paste. Saute until you see oil releasing from the sides of this mixture.


7) Open the lid of the pressure cooker and using a blender grind the spinach, daal, garlic and green chili. You will get a dark green paste.


8) When you see oil has separated from the tadka add in the turmeric powder, red chili powder and salt. Mix.

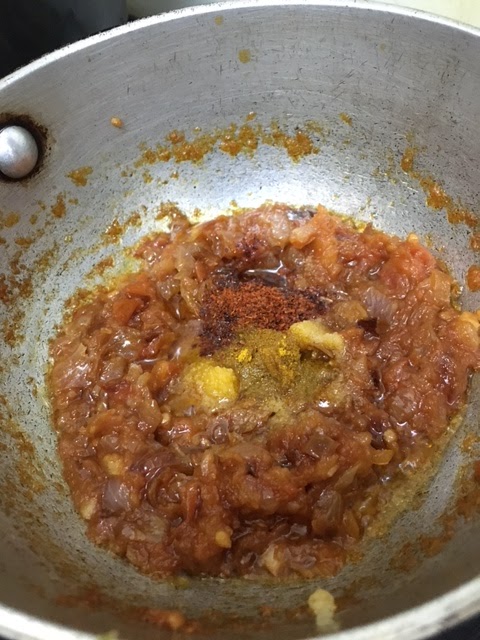


9) Now add in the dark green paste to the tadka. Mix well. Add in half a cup water of you find the daal palak too thick. Boil it.

Serve with a dollop of butter along with fresh chapatti or parathas!


How do you incorporate spinach in your diet?

Tell me all the tips and tricks you use to hide it in the kids meals to make sure they are eating this healthy green leafy vegetable! I'd love to read and be enlightened.

Thanks for reading! :-)

Thursday, April 21, 2016

Baingan Bhadta or Roasted Eggplant


Punjabi cooking
is interesting as a number of methods are used in cooking different kinds of food. From deep-frying in huge woks to roasting a flat round chapatti in a tandoor (clay oven), unique methods used in North Indian cooking make the process intriguing and leave the dish tasting authentic and unique.
 

There is no other way Punjabis would have their brinjals than making a bhadta out of them! Baingan ka Bhadta is prepared by slow roasting the oval dark purple large varieties of brinjals on an open stove and then mashing up its roasted pulp to mix it with a tadka of tomatoes and onions.

Known in India as Brinjal, this smooth skinned, shiny deep purple vegetable is rich in vitamins, minerals and fibre. Alternatively called aubergine or eggplant, this is healthy enough for weight watchers as it is low in calories and has no cholesterol or fat. Buy the long oval shaped deep purple ones. The ones with lesser seeds in them will have a smooth shiny skin and will be long and light-weight.


Baingan Ka Bhadta is cooked every week at any North Indian house, and all at home can take in the fragrance of stove-top roasted brinjals. The roasted brinjals smell just so awesome! It is a spicy, dry main course eaten mostly with chapatti or paratha (griddle-fried flat bread) for lunch accompanied by raita (yoghurt-based side dish generally made with boondi or chopped/grated veggies like cucumber, onion, tomato etc). Baingan Bhadta is made in two ways. My late grandma used to make a salad dish version by mixing roasted and mashed brinjal with freshly chopped onion and tomatoes, green chili with only salt and red chili powder in it. We called it kachcha or raw bhadta and used to relish it with phulkas or chapatti or just like that with a sprinkle of lemon. Sadly that dish is no more made these days. I will try and share the full recipe for it!


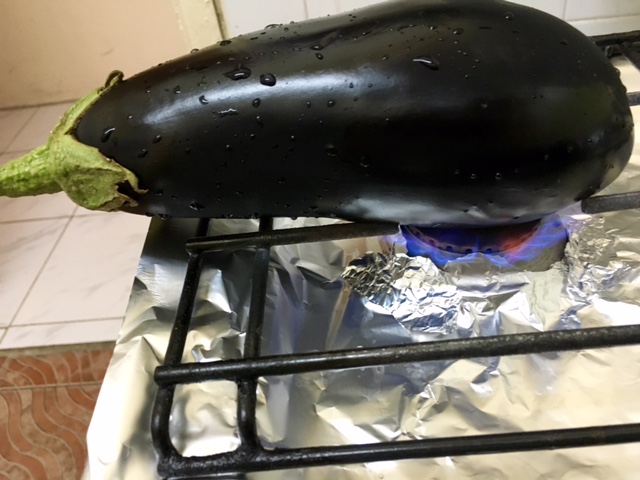
Baingan Bhadta is worth all the mess it creates and the time it takes to prepare it. We need to roast the brinjal well till the purple skin chars well changing to a flaky black and the skin starts curling. My golden rule to check if the brinjal is roasted perfectly or not is by inserting a knife into roasting brinjal, if it comes out clean and without any effort its done.

Prepping Time: 10 min
Cooking Time: 30 min
Difficulty: Medium
Messy: Yes

Tip: To reduce the mess I like to line my stove top with foil paper.

Ingredients:


2 medium brinjals (600gm)
4-5 onions, finely chopped
3-4 tomatoes, finely chopped
4-5 green chilies, finely chopped
3-4 tbsp Cooking Oil
1 tsp red chili powder
salt, to taste

Method:


1) Roast over an open flame for 10-15 min or until the brinjal turns black, while turning occasionally.


 2) Keep aside to cool.


 3) Heat cooking oil in a wok and add chopped onions.


4) Until onions brown, chop the stem and discard. Now peel the skin pinching it off the brinjals and mash the brinjals. Keep aside.


5)  Keep on checking the onions and stir fry until golden brown like this.


5) Now add chopped tomatoes, green chilies and stir.


6) When tomatoes are mushy, and turned into a paste-like consistency, add red chili powder and salt. 


7) Mix and stir fry for 2 min and when you spot oil has separated from the tadka....


....add the mashed brinjal. Mash and mix properly with the kadchchi or large spoon.


Serve with hot phulkas (chapatti) or make these yummy parathas (griddle-fried flat bread) like I did!


Have you ever tried this wonderful dish?

How do you like to eat it? At home with a fluffy phulka or dhaba-style with lots of green chilies? 


Tell me how do you make your brinjal recipes? I'd love to know you cook this wonderful vegetable!

Thanks for reading! :-)

Wednesday, March 16, 2016

Rajma Chawal or Red Kidney Beans with Rice


Rajma chawal is a very famous North Indian dish cooked frequently in almost all Punjbai households every week. It is a staple dish, when mothers in North India are setting menu for a get-together. It is that dish that takes away all the attention from the other dishes cooked at a family dinner, no matter what it may be.

When you ask what's for lunch/dinner today? Rajma chawal is the answer that just makes your eyes brighten and smile widen. It is something that is liked and loved by one and all at home. Some like to eat their rajma chawal with a lot of thick gravy, while others may want more of rajma to appear alongside their rice. Some like to have it with aam ka achaar or mango pickle while others like to eat it with a salad of onions sprinkled with lemon juice and salt. Some like rajma chawal with raw whole green chilies in their plate while others like it with some pudina chutney or mint dip. Everyone has a way of relishing their own plate of rajma chawal and long discussions are carried over how they like to eat their rajma chawal.


For a Punjabi, rajma chawal is not just food. It is a feeling, an emotion. It is something siblings fight over. Who finished the leftover rajma chawal I carefully put into the fridge last night? It is something children make a scene over when they come back from school. Mom, why didn't you save some rajma chawal for me or why didn't you cook rajma chawal today?

These were the questions I and my siblings have grown up asking and creating a scene and picking up a fight over. :-)


I make it a point to always cook some extra rajma chawal. I love the taste of the rajma my mother cooks and how I make rajma is totally inspired by her recipe. Though the ones I make, taste very similar to that of my mom's rajma but then they only taste similar. The real taste of my mom's rajma which is never over-cooked that every bean of rajma can be seen intact, the gravy is never too thick neither too watery. The spices are never too much nor it tastes bland. It is always the perfect taste. Tender, rich, drool-worthy and just awesome.

Rajma are high in protein and full of carbohydrates. It is cooked with a lot of whole spices and a thick gravy of onions and tomatoes, stewed over low flame for a long time. Rajma is one of the staple foods in North India loved religiously by everyone. Rajma is mostly served with boiled rice and thus the combination 'rajma-chawal' came into being. However, rajma tastes equally great with hot parathas or flatbread and phulkas or chapattis. My mother always makes rajma early in the morning and serves fresh, hot and bubbling bowls of these red kidney beans with hot and crunchy parathas slathered with homemade butter and hari mirch ka achaar or green chili pickle. It is one thing I used to love waking up to before my marriage. :-)


Many cute jokes and sweet one-liners are based around this beautiful dish. One of them is "I can't make everyone happy. After all, I am not Rajma Chawal." :-) Here is another one: "Whenever life seems difficult. When things all seem to be going wrong. When the world is against you. Just eat rajma chawal." :-)

Let me share with you how I make this delicious curry step by step accompanied with lots of pictures. Once again my recipe is stolen from my mother. :-)

Ingredients:

1 cup Rajma or kidney beans soaked overnight or atleast for 2-4 hours
2-3 onions, grinded
4 tomatoes, grinded
4-5 garlic cloves, peeled
4-5 green chilies
1 tsp red chili powder
1 tsp coriander powder
2 tsp turmeric powder
1 tsp garam masala or all spice powder (optional)
salt, to taste
4-5 tbsp cooking oil
coriander leaves, chopped
5 cups water

Serves: 4
Prepping time: 15-20 min
Cooking time: 40-60 min
Difficulty level: Easy

Method:

Boiling and pressure cooking the rajma:


1) Take a large pressure cooker. Add water and bring to boil. Now add the soaked rajma. Put the whole garlic cloves with 1 tsp of turmeric powder and salt, to taste.

2) Put on the lid and let it whistle 4-5 times on high and then keep it on low flame for 20 min. Switch off the gas and do not open the lid until all moisture evaporates.


Making the tadka or curry:

1) While the rajma is whistling away in the pressure cooker. Heat oil in a non-stick pan. Add the onion paste and let it brown on low flame until brown. Saute in between.


 2) While the onions are browning. Grind the tomatoes and green chilies to form a puree in a blender.


3) Keep the tomato puree ready and add to the browned onion paste.


4) Mix well and cook on low flame.


5) When the oil separates from the tomatoes, the tadka will look like this:


 6) At this stage add your spices - turmeric powder, red chili powder, coriander powder and salt. I don't use garam masala as I find it too spicy for Little M. Mix well.


7) When all of the steam has evaporated, open the pressure cooker and with a spoon take out the garlic cloves. You can totally skip this step and just try to mash the garlic cloves inside the cooker.


8) Add the garlic cloves to the tadka. Mash and mix well.


9) The tadka is now ready to be added to the rajma.


10) Add the tadka to the pressure cooker. Mix well and bring to boil.


Tips:

* If you find it water, let it boil uncovered for a good 10 min and it will thicken.

* Check your rajma if its cooked by trying to mash using a spoon. If you think its still uncooked. Put the lid back on the pressure cooker and let it whistle for 10-15 min on medium flame.

* To cut the cooking time of rajma, make sure to soak it overnight.


Finally add the chopped coriander leaves.


Serve hot with freshly boiled basmati rice.


How do you like to eat your plate of rajma chawal?

Do you like to make it watery or you prefer a thick gravy?

Do you like to include some ginger in your tadka?

Tell me all about your secret recipe for cooking rajma.

I would love to read your thoughts..


 Thanks for reading! :-)

Sunday, March 13, 2016

Bombay sandwich or Pudina chutney sandwich


It is great to feel the chill in the evenings in the UAE in the month of March. We love to spend our weekends outdoors in the lap of nature. It is in the winter season that we like to ditch the malls and plan picnics, barbecue sessions at the numerous parks, beaches and in the serene deserts in the UAE.


Seems like winter has just a few more of these lovely chilly weekends in its kitty for us. And we are making the most of the pleasant weather before the harsh summers take over.


Last weekend we went to explore the many lakes in Al Qudra and indeed it was one great adventure as we drove around really close to the lake and took in all the beautiful sights, one scene at a time.

It was serene and calm as many people circled around the lakes setting up their picnic tables and lighting up the bonfire to either sing and dance around or begin their barbecues.

We took in the fresh chilly winds and strolled around the lake, taking in the beautiful views of the sunset and admiring the only music of chirping of birds, quacking of ducks, laughter of kids and the sounds of clapping and singing from a group of people circling around a bonfire at a distance.


Little M loved feeding bread to the beautiful ducks adorning the lake and later took out his sand play toys to play and mold the wet mud. His clothes were literally covered in wet sand but his eyes were shiny as he smiled brightly twisting and shaping the sand with his hands.


We went with a few chicken wraps (bought on our way) and these Bombay chutney sandwiches that Little M helped me put together. The little guy insists that I let him help me whenever I am working in the kitchen so I happily hand him simple tasks such as washing the veggies or buttering the bread. He puts in his 100 percent concentration to complete what is handed to him. That I really love!

It gets messy when he is around to lend his helping hand and takes a bit longer to get done with the task at hand but I let him do it anyway as I feel it is very important for him to learn certain simple life skills such as buttering a toast or cracking an egg.


So we go along the entire procedure singing songs and reciting rhymes, talking about the food we are prepping as Little M licks the butter and bites into a carrot.


These Bombay sandwiches are pretty easy. They require some mint dip or pudina chutney, veggies of your choice and taste yummy when toasted. (You can find the super simple recipe of the mint dip here). These simple sandwiches can be had as a snack, packed into snack box for school or office, carried along on picnics and even served as a quick breakfast.

It is healthy and nutritious and perfect to feed our little ones who shy away from eating their vegetables. Whenever there is fresh mint chutney sitting in the fridge, this is a go-to snack for me,  simple, quick and packed with the goodness of veggies.


 Let me share how we put together our Bombay sandwiches:

Ingredients:
Bread slices
Mint chutney
Butter
1 boiled potato, peeled and sliced
1 boiled beetroot, peeled and sliced
1 onion, sliced
1 cucumber, sliced
salt and chat masala, if required

Method:

We started by buttering the bread and then smearing it with green pudina chutney.


Then we arrange our veggies starting with boiled potato and beetroot slices.


Next we top it with a slice of cheese and close our sandwich and toast in the toaster until crisp.


We didn't add any salt or seasoning as the salted butter and pudina chutney lent its taste and I didn't want to make it spicy as it was being prepared for Little M.


At times when I am making it for husband and myself, I like to sprinkle some salt and chat masala to give it a chat-pata, tangy flavour.


Once the toast is ready just open it a little and put in your onion and cucumber slices. I don't want them to lose their crunch which is why I add them after the toasts are done.


The Bombay sandwiches are ready in under 10 minutes.

Serve it with tomato ketchup or with a cup of kadak chai or strong tea!


How do you like to make your sandwiches?

If you try this recipe do share your pictures with me on Facebook and Instagram with the hashtag #DilliToDubai.

Please share your thoughts on this quick breakfast in the comments section below. I would love to read what you think. :-)


Thanks for reading!