Showing posts with label kids meal. Show all posts

Monday, May 30, 2016

Cook With Kids: Mango Parfait


One of the reasons I love summers is because we get a variety of mangoes in abundance during this season. Come summer and mango would be mentioned in our conversation frequently at home. That bag of season's first mangoes that my mother would get from the neighbourhood fruit and vegetable market was so treasured by my siblings and I.


Whenever heading to the market, mom would always ask to check if there are enough mangoes at home or not and so many times when mom would get 2-3 kgs of mangoes, my father would also come home with the same amount at night. :-) Mangoes would never go out of stock at our home during summer.


Mangoes would be the reason we would love to rush home after school. As we would finish our lunch, mom would ask each one of us whether we want our mango full or to be sliced. My sister, brother and I would each get one whole mango to ourselves and we would hardly like to get it sliced. Eating the dussehri mango would mean biting off the black part on top of the mango to make a small opening and pressing with hands to suck the pulp out of this yummy fruit. We would never let a drop of the juice going down our hands or elbows to fall or go waste and would lick the juice starting from our fingers, hands, down to our elbows, giggling away.

I am of the kinds who do not like anyone tempering with their favourite fruit/recipes and I liked to eat my mango as it is, chilled from the fridge. No other flavoring or mixing for me, please. At most that I would let anyone play with my mango is to make a mango milkshake out of it or some mango ice-cream, made at home. I do not like the taste of store-bought mango ice cream and only enjoy eating a mango cream duet popsicle or an ice mango pop. But last year at my son's nursery when I had gone for a healthy cooking competition to mark Mother's Day, I tasted a mango parfait. I had no idea what a parfait meant, it was like a creamy layered dessert served in a glass, topped with chopped fruits. Tasting it was heavenly and I knew this is one thing I am going to try and learn and make it for my family in summers.


Now there are so many versions of parfait all over the internet that I end up getting confused whether to use yoghurt as a healthy alternate for cream in order to create layers. Many parfaits have a layer of oats and smoothies. Since I had recently made a bowl of fruit custard, I was brimming with ideas to serve the custard (see the above picture) to my family in a new way.


Method:

I made this mango parfait by layering it with a slice of chocolate cake (that I made in a mug in the microwave, see the recipe here), mango fruit custard (Click for the recipe), mango chunks and pulp and pomegranate seeds.

Then I let Little M arrange one of the glass jars by first showing him how to do it and then asking him to repeat the steps one by one. He absolutely loved doing it. You can also involve your kids in arranging the parfait jars with their own choice of ingredients. Just keep everything ready in advance. Chop the fruits, slice chocolate cake and prepare the custard and let your little ones make their own beautiful custard and fruit jars. You will be surprised by their imaginations and ideas as they create their own masterpieces. Why involve kids in the kitchen, you may wonder! Well, see the number of benefits I listed out here!


This is a super simple recipe that I highly recommend everyone to try out. The simplicity of this recipe amazes me and we can do so many variations in creating the layers. For example, you can completely omit the cake and use crushed or broken Marie/digestive biscuits. You may even create a layer using chocolate syrup or chocolate ice cream or use some other fruits such as grapes, apples. One may also garnish with dry fruits and nuts instead of pomegranate. Since this recipe is so versatile I did not feel the need to list out the exact measurements of the ingredients and the steps or method.


Ever since we made it together, my little one keeps on asking me to make it again! Plus, this is another recipe which is no-cook and totally fuss-free and the arranging of the parfait can be done by involving kids too! Now I have a quick dessert recipe for days I and my family are craving for something sweet. This one is surely going to be a saver to please unexpected guests or an impromptu dinner get-together.


Hope you enjoyed reading this sweet recipe as much as I enjoyed making it!

Have you tried making a parfait? What are favourite ingredients to us in a parfait?

Tell me all, I'd love to read what you all think!

Thanks for reading! :-)

Tuesday, May 17, 2016

Cook With Kids: Bread Pizza


This is the first recipe I am sharing that can be made easily with kids. Bread Pizzas are so versatile that you can make them interesting in so many ways. Layer them with different vegetables and loads of cheese and it becomes kids favourite instantly.


Ideal to pack for kids lunchboxes, I often send it to Little M's school. Plus its easy, quick and loaded with the goodness of veggies and cheese. What more can a mom ask for? :-)


Involve kids in making these beautiful bread pizzas on weekends and set a happy tone to a dull evening. I have already listed here the benefits of cooking with kids in the last blog post. Have you seen it?


These stove-top bread pizzas are so easy that I didn't feel the need to list out the method step by step. However I will still try to explain the process in detail.

Preparing Time: 10 min
Cooking Time: 5-7 min

Ingredients:


Bread slices
2 tbsp olive oil
2-3 tbsp tomato ketchup
1 cup blanched and chopped baby carrot, baby corn, sweet corn
1/2 cup of finely chopped onion, tomatoes
Cheese strips

See how Little M helped me make this super snack.


I asked Little M to slather tomato ketchup and olive oil on the brown bread slices and then arrange veggies that I had blanched and chopped beforehand.

His favourite part was topping his bread pizza with oodles of cheese. :-)


These bread pizzas can be made on the tawa (griddle).  After Little M finished decorating the pizza, I handed him a plate and ketchup squeezer and told him to make a ketchup smiley (a good way to work on those fine motor skills too).


Meanwhile, I heated the tawa and then put two of these colourful pizzas on top and then covered the tawa by turning a large bottomed bowl upside down on it.


I have seen my mother use this method and now I use it to roast beetroots or make stove top pizzas. Just wait for 5-6 min for the cheese to melt and your bread pizza is ready.


Note: Try and not leave the pizza bread on the heat for a long time as it can make the bread too hard. Keeping it for 5-6 min helps make the bread crispy and soft from top.


Do you like getting kids in the kitchen? What are your favourite recipes to whip up with the kids?

Tell me all. I'd love to read your thoughts.


Thanks for reading! :-)

Tuesday, March 29, 2016

Veg Chowmein

A good bowl of chowmein is my weakness. I am humbled to have grown up in meri dilli or Delhi where Indo-Chinese food is available everywhere in its most authentic form. Chowmein or noodles is the main flower in the beautiful bouquet of Indo-Chinese cuisine, which is hugely popular in India.


It is very typical of Delhi roadsides to have food carts, food trucks or vans selling Indo-Chinese food such as manchurian, chopsuey, hakka noodles - all Chinese dishes with an Indian tadka.

Chowmein or noodles are quick and easy to make and very nutritious. The more the vegetables the better it tastes and is healthy too. It is any kid's favourite meal and a much healthier and nutritious alternative to the packet noodles advertised on the television that claim to be ready in 2 minutes.

Of course, we love a piping hot plate of Maggi once in a while.

Since I started making this veg noodles at home I got rid of the guilt associated with cooking 2 minute meals which are barely nutritious.


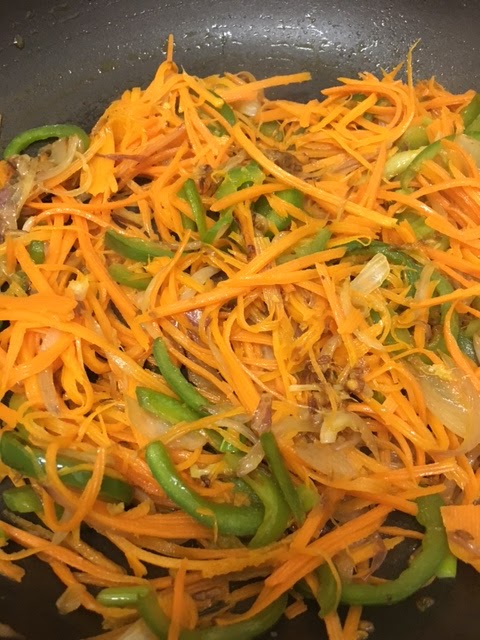
I love loading up my chowmein with different and colourful vegetables such as carrots, red, yellow and green bell peppers, cabbage, onions and spring onions. Sometimes my noodles also include mushrooms, broccoli, baby corn and sweet corn, if these veggies are in my fridge.

Little M is the reason I started cooking chowmein at home and the other reason is that in the UAE it is difficult to find authentic taste of dilliwali chowmein. Since my little boy so loves the noodles I hardly put chili sauce or green chili as I want him to enjoy and relish it. Sometimes after separating his share or packing enough for his school lunch box, I put in red chili sauce or slit green chilies to give it that dilliwala spicy tadka.

Difficulty: Easy
Prepping time: 15 min
Cooking time: 15 min


Ingredients:


2 tbsp ginger-garlic paste (I used finely chopped)
2-3 tbsp oil
3-4 stalks of spring onion, vertically sliced
1 onion, sliced
1/2 green capsicum, sliced
2 carrots, shredded
1/2 cup cabbage, shredded
2 tbsp soy sauce
1 tbsp white vinegar
1 tsp black pepper powder
1 tsp red chili powder
spring onion greens, for garnish
1 packet of noodles
2 tbsp red chili sauce/hot sauce (optional)
1/2 orange and yellow bell peppers, sliced (optional)

Method:


Before you put on the flame make sure that each ingredient is on the shelf including chopped or shredded veggies, sauces and seasonings. I think preparing the ingredients and getting them ready beforehand decreases stress, burns or accidents, and that way the cooking becomes more organised.

The chowmein is going to take a big wok and a medium to high flame and for you to keep stirring to avoid veggies to burn or become mushy. We want our veggies to be soft yet crunchy!

So first prepare all ingredients as chowmein is a quick dish and you will need to quickly add all ingredients to the stir fry process.

Boiling the noodles


1) In a pot put lots of water. Add 1 tbsp olive oil (or any other cooking oil) and a pinch of salt. Let it boil and then add the noodles. It would roughly take 2-4 minutes for the noodles to cook. But its best to refer the packet and prepare according to the kind of noodles you are using.


We need to cook the noodles half way to avoid them becoming mushy or sticky. Strain the noodle in a colander after it is half way boiled, and I also take the colander of noodles and strain it under running tap water to avoid the noodles from sticking. At this step I like to add 1 tbsp of oil to the noodles and mix well without breaking them. This ensures the noodles aren't sticky.


Set aside the boiled and strained noodles.


Stir frying the veggies:


You may use all of the veggies mentioned above or you may just do with onion, spring onion, carrot and capsicum. Make sure to add half the quantity of each vegetable when you are using many different veggies.


1) Start by heating up oil in a wide non-stick wok. On a medium to high flame, add ginger-garlic paste. Stir fry until the raw smell goes. (I used finely chopped ginger-garlic)


2) Add spring onions. Stir.


3) Onion slices need to be added without over cooking spring onions. Stir fry on medium to high flame.


3) Add in the carrots. I used both Indian red carrot and the orange carrot. :-) Stir fry.


4) Put the sliced bell peppers, cabbage. Stir fry.

On a low flame cover the wok for 2 min for the veggies to soften in steam.


5) Remove the lid and stir on high flame to remove moisture. Add in soy sauce, black pepper powder, red chili powder, salt to taste. Stir well.


6) Finally add the noodles and 1 tbsp vinegar. Using two kadchhi or spoons mix the noodles with the veggies tadka with a light hand. Be careful not to break the noodles!


Garnish with chopped spring onion greens and serve hot.


These can be eaten just like that or even accompanied with this Chili Tofu Gravy recipe or veg or chicken manchurian.


How do you like your noodles or chowmein?

Do you like it spicy like me and like to add in red chili sauce and lots of slit green chilies too?

Tell me all that is running in your mind about this recipe of chowmein!

I would love to read what you think!


Thanks for reading! :-)

Sunday, March 20, 2016

Guacamole


Guacamole is a Mexican dip that is made from finely chopping or mashing avocados.

Avocados are not commonly consumed in India but slowly this wonder fruit is finding its way into our smoothies and milk shakes. Why call it a wonder fruit? Going by the nutritional value and the unique taste of this fruit, neither sweet nor sour, that makes it versatile to be consumed as a filling breakfast or a snack made yummy in a jiffy.

Top its slices on your bread, whip it into a smoothie or toss it in the salads, there are many interesting ways to include avocados into your daily meals.

Avocados have a variety of nutrients such as fiber, vitamin B, C and are packed with a lot of "good fats" essential for our body.

It is exceptionally good for children and often goes into Little M's milk shakes during the summer.

Coming back to guacamole, I had my first taste of this wonderful dip made by my talented blogger friend Tasneem who blogs at Thoughts Over Chai. The green paste that I didn't know anything about was devoured atop crispy nachos. The creamy taste of avocado lingered in my mouth while the nachos added the crunch into every bite. I quickly asked for the recipe.

This dish was alien to me. So I expected the ingredients also to be fancy. To my surprise they weren't!

Give me healthy food and it is surely going to be included in my family's meals one way or another.

When trying a new recipe, what could be better than finding all the ingredients on the list in your pantry? Another thing to love about this amazing dip is that it helps you prep up "no-cook"  meals and is ready in minutes.

The only change I made to the dip was that I didn't mash the avocado, but kept it chunky by chopping into tiny pieces, but you can always go ahead and mash the avocado pieces using a fork.


It is a good starter to please your guests before dinner and makes a yummy snack for children as well.

Little M is at home these days and before kindergarten starts next month I take every opportunity to spend quality time with him whether at the park and at home doing painting, playing with homemade play dough or in the kitchen as together we "cook" some simple meals that don't take long to finish.

I am on a constant look out for creative ways to keep Liitle M busy and thus away from the lure of TV or the ipad. If I am cooking in the kitchen I try to involve Little M by handing him simple tasks such as washing the veggies or buttering the bread. Most of times he obliges happily.

It is a good snack to prepare with your little ones as it doesn't require too much of an effort and the kids can help with chopping the avocado (with a plastic knife) and stirring up the veggies together or even in decorating their own chips!


Handing him the plastic knife after I scooped out the avocado, I asked him to roughly chop it into pieces.

If you do not know how to peel an avocado I would recommend that you check the internet for a video because it is super simple and uncomplicated.

I like to learn simple hacks to simplify and quicken daily tasks in the kitchen. Watching a video on how to simply peeling a pomegranate on Facebook really changed my life and now it is often consumed at my house as compared to before when I found getting pomegranate seeds out a big deal.

An avocado requires no peeling of the outer skin at all and is simple to get the pulpy flesh out in under a minute.


Avocados tend to blacken when peeled, so it helps to be quick with the chopping and sprinkling lemon juice asap to keep avocado from turning dark.


For the same reason, do not prepare this dip in advance. It can be made in under 10 min, so make it when you want to eat and serve it fresh.


Ingredients:


2 avocados, finely chopped (or mashed with fork)
1 onion, chopped
1 tomato, chopped
juice of 1 lemon
coriander leaves, chopped
2 green chilies, finely chopped
salt, to taste

Method:


1) Chop or mash the avocados in a bowl. Sprinkle lemon juice fast to keep avocados from darkening.


2) Mix in all ingredients in a large bowl.

I separated a few spoons of guacamole for Little M and then added the finely chopped green chilies.


Guacamole dip is ready! :-)


 3) Serve as dip with nachos, chips, monaco biscuits or the Indian papad. :-)


Found a single kuboos or pita bread lying in my bread basket. Warmed it on a tawa or griddle alongwith some butter, making it slightly crunchy and layered the guacamole on top of it!


Not only was this recipe a time-saver but it really saved the dinner last night as I had not cooked anything. Do try this super quick and innovative dip that is ready in minutes and without breaking your back for hours in the kitchen.


Do share your thoughts on this recipe with me. I would love to read them.

Have you tasted guacamole? Or tried making it? How do you make yours? What are ways you include avocados in your family's mealsPlease share your ideas with me.


Thanks for reading! :-)


Monday, March 14, 2016

Pancakes


Now show me someone who doesn't love a warm, mildly sweet and fluffy pancake! Don't we all love pancakes and especially those of us who have a sweet tooth? :-)

This is an American version of pancake, a round and fluffy cake made instantly on a non-stick griddle by spreading a batter made with eggs, flour, sugar, and some raising agent. The British crepe is a slightly thinner version of pancakes.


In India we make pancakes that aren't sweet such as the South India Dosa and Uttapam, the Punjabi besan ka puda. The sweet varieties are malpua and meetha puda. The sweet pancakes in India are mostly sweetened by gud or jaggery whereas the salty or spicy pancakes are made from either rice flour or chickpea flour.


At times when I am running late or not in a mood to chop veggies, these pancakes come to my rescue and wiped off by husband and Little M within minutes. These pancakes are mildly sweet and can be put on the table within 15 minutes. These are excellent to pack for the school or office and the batter can be made the night before and stored in the fridge for finishing up the early morning dabba packing in under 5 minutes.

You can also add fruits like blueberries, bananas by chopping or mashing it into the batter. Many varieties are available on the internet. This recipe that I share here is inspired by this one with a few tweaks here and there.

What more can a mom ask for on a lazy Sunday morning? Sunday is the first working day for us here in the UAE when schools and offices resume after the weekend break. Weekend in the UAE means Friday and Saturday. :-)

Little M loves helping me stirring up the batter and cracking the egg. Of course we have many spills!


Ingredients:


1 1/2 cup all-purpose flour
1 tsp baking powder
1 tsp vanilla essence
1 tbsp sugar
1 1/4 cup milk
1 egg, beaten
3 tbsp butter, melted (optional)
1 tbsp oil

Makes: 8 pancakes
Prepping time: 5-7 min
Cooking time: 5-7 min

Method:


1) Take a large bowl, sift together the flour, baking powder and sugar.


2) Using a kadchi or service spoon make a well in the center.


3) Pour in the milk and then the beaten egg and melted butter. Mix until smooth. There should be no lumps.

4) Heat a lightly oiled non-stick tawa or griddle. Pour the batter on it using a round-deep kadchi or service spoon, using approx. 1/4 cup for each pancake.


5) When you start seeing tiny holes on the upper side being formed turn the pancake on the other side. Brown on both sides. Serve hot and drizzle lots of honey on them for a natural sweet taste.


The teddy-face shape below can be made easily by pouring one kadchi of the batter in the middle and then two spoons on the top on each side for the ears. Use blue berries or grapes to make eyes and surprise your kids with a cute bear-shaped pancake! :-)


The heart and flower shapes were cut out by Little M using cookie cutters


This is how I prepare my plate of pancakes, with fresh fruits from my fridge, accompanied by dry fruits and nuts bathed in honey!


How do you like your pancakes? 

Do you prefer making the Indian pancakes such as Dosa, besan puda or malpua? If yes, the please do share your recipe with me in the comments section!

Do share your thoughts with me on this simple breakfast made yummy in a jiffy. I would love to read what you think. :-)


Thank you so much for reading!