Sunday, February 28, 2016

Veg Chilli Tofu


Something amazing happened last week when I was browsing down the aisles of our local supermarket I stumbled upon Tofu. I immediately put it in into my trolley and it was one of the best food decisions I made as someone who is always on the scout for healthy cooking options.

Now what is tofu, some of you may ask. It resembles the highly valued (specially by vegetarian North Indians) paneer but is a way more healthier swap for paneer aka cottage cheese. the white soft and spongy blocks of Tofu are made from soy milk and it is a nutritionally packed food, high in iron, calcium and other micro nutrients but low in fat. :-)

A lot has been said about the health benefits of tofu, so without much ado let me share with you my first time cooking experience with tofu.

I got 500gm of fresh tofu for only AED 5 (price way less than paneer) and cooked two recipes with it and one of it was chilli tofu.

The basic rule is to treat tofu as you treat paneer and cook in the same as it tastes and looks just the same.

This chilli tofu is a vegetarian's delight cooked with vegetables like green capsicum and onion. It is a dry recipe and a spicy Indo-chinese version so we will use soy sauce and hot red chilli sauce.

It is not a quick recipe and it took me 40 min to get done with it but once the husband - M and Little M tasted it I knew it was all worth the effort and time.

I have already been getting requests from M to make the chilli tofu once again. :-)

You can serve it with fried rice which is what I did or eat it as a dry starter or even roll it up into chapattis to make a chilli tofu wrap which can be an easy lunch box snack.

Here is a step by step recipe with lots of pictures :-)


For marinating tofu:

  • 250gm tofu, cubed
  • 2 tbsp corn flour
  • 1/4 tsp red chili and black pepper powder each
  • 2 tbsp oil
  • salt
For gravy:
  • 1 onion, cut in squares
  • 1 capsicum, cut in squares
  • 1-2 spring onion greens chopped
  • 1 tbsp each of ginger and garlic, finely chopped
  • 5 green chilies, sliced vertically
  • 1 tbsp soy sauce
  • 1 tsp hot red chili sauce or hot sauce
  • 1/4 tsp each of red chili powder, black pepper
  • 2 tbsp water to add in corn flour
  • salt

Method

Marinating tofu

  1. Start by patting dry tofu and then cut it into cubes.
  2. In a mixing bowl, put the tofu cubes and add 2 tbsp corn flour, 1/4 tsp of red chili and black pepper powder each, 2 tbsp oil and a pinch of salt
  3. Mix it all very gently and carefully without breaking tofu cubes.

Frying tofu


  1. In a non-stick tawa or frying pan, put 2 tbsp of oil and fry marinated tofu cubes on a medium heat without breaking the cubes until golden and crisp. Make sure to not fry for more than 5 min as it will harden the tofu cubes.
  2. While the tofu is being fried in the bowl in which we marinated there will be some leftover corn flour and spices add 3-4 tbsp of water to it and mix. We will use it later to thicken our gravy.
3. In another small bowl, take 1 tbsp soy sauce, 1 tsp hot red chili sauce or hot sauce, 1/4 tsp each of red chili powder, black pepper and mix with a spoon and keep aside.

Preparing the gravy


  1. In a non-stick pan add 1-2 tbsp oil and add the finely chopped ginger and garlic. Stir.


2. Add the onion and capsicum.


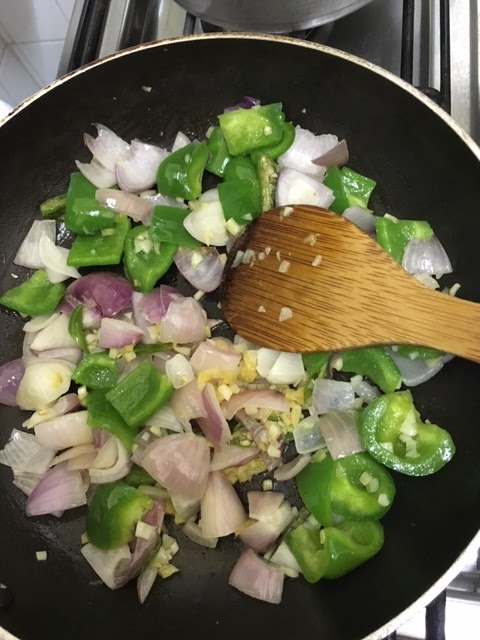
3. On medium heat stir fry the veggies until capsicum is cooked.


4. Add the mixed sauces and salt but not too much of salt as the sauces already contain salt. Stir.


5. Add corn starch paste. Stir and check the taste and add salt or red chilli powder if required. Add the pan-fried tofu cubes. Stir.


Garnish with spring onion greens and serve hot.

I would highly recomend this recipe if you like a hot and spicy stir fry. Go ahead and try this easy recipe that will surely make you and your family happy.

Please do share your thoughts with me on this recipe and drop me a line or two about how your recipe turned out. I would love to read what you think! :-)

    Tuesday, February 23, 2016

    An afternoon at Bosporus Dubai

    A number of times when we pass by the posh Jumeirah road which is dotted with villas and countless fine dining restaurants, I would be excited to see the banner of 'Bosporus' restaurant and would suggest the husband to visit it sometime.


    Why excited to see the banner of this restaurant, you might think. Well, simply because we have visited the country where it belongs to.

    Bosporus is a Turkish restaurant and is named after the geographically important Bosphorus bridge.

    A click of the beautiful Hagia Sophia mosque from our trip to Istanbul a few years ago
    It is not an ordinary bridge. Bosphorus bridge connects the two continents of Europe and Asia and is the most famous landmark of Turkey's largest city - Istanbul.

    Sadly I don't have a picture of the said bridge but I do remember the ferry ride that we took beneath the iconic bridge on a cool windy morning in January 2014.

    A couple of weeks back the husband bought a deal of pizzas for Bosporus from Cobone and we visited its Jumeirah outlet just a day before Valentines.

    Bosporus is located at five locations in Dubai with its Turkish architecture-inspired interiors in Downtown Dubai and Wafi Mall among other locations. We landed at one of their two Express branches, in Jumeirah which is a mini cafe with only a few tables. Little did we know that the outlet we are going to be visiting will be a mini express outlet. By the time we reached we were quite hungry so we anyway sat in their one of the few outdoor tables to have a lunch of Turkish pizzas. May be we will visit their outlet at Wafi to experience their full-fledged ambiance of Turkey.

    The weather is nice here in Dubai these days and was particularly pleasant that afternoon so we enjoyed sitting outside enjoying the view of expensive cars parading down the Jumeirah road, a usual sight in that part of Dubai. There was only one more occupied table and no other customers, which was surprising on a Saturday (an off-day for most people in UAE) afternoon.

    Since we had the option of ordering two pizzas we decided to order their medium-sized Turkish Pizza (with vegetables) and another one a Chicken Pizza, both priced at a very reasonable AED 45 each. But our server told us we can only order the vegetable pizza, and we questioned her saying, 'if both the pizzas are priced same and our voucher doesn't specify the choice of pizza, then why can't we order pizzas of our choice?' Finally, she gave us the benefit of doubt and twenty minutes later we had these beauties sitting atop our tables accompanied by fries and cola.


    Being a fan of thin-crust pizzas, I was delighted by the sight of these two round beauties laying cheerfully in front of me. Seeing the size of their pizza we were sure we (2 adults and a four-year-old) won't be able to finish them.

    The vegetable pizza was full of veggies, which pleased me as a mother that Little M was going to eat something healthy and not full of cheese. It was perfectly spiced with Arabic spices and was neither too soft nor very crisp. I did find it difficult to chew on the sides of the pizza crust and refrained to give the sides of the pizza to Little M.

    The chicken pizza was a delight with wonderfully roasted pieces of chicken which had a barbecue/tandoori taste to it and full of goodness of veggies. Pizzas for us fared to be 8/10.

    Service was 7/10 and I wouldn't rate them on ambiance since I visited Bosporus Express outlet.

    The other dishes that caught my eye on their menu and would like to try on my next visit is definitely Lahmacun (looked like a flat pizza bread full of minced meat) and their Doner Kebab rolls and Sauteed Vegetables with Chicken.

    All in all it is not very highly priced eating option with delectable food for someone who needs just what Bosporus provides - Your Bridge To Turkey!

    The opinions expressed in this write-up are my own and have not been influenced by Bosporus Dubai in any form.

    You can visit their website for reservations and more information.

    Leaving you with another beautiful view from Turkey

    Sunday, February 21, 2016

    Methi Paratha / Fenugreek leaves flatbread

    The fragrance of methi or fenugreek leaves is my second most favourite among all the fresh 'greens' fragrances after dhania or coriander leaves.

    It takes me back to my home and evokes the nostalgia of Delhi winters when my mother would make parathas or aloo methi sabzi (potato fenugreek stir fry) after carefully plucking out the freshest of the leaves from huge bunches of methi.

    The deep pungent smell of methi wafting from the kitchen would be the best surprise for me once I entered home after school. My siblings and I would devour it with fresh chapattis straight off the tawa lovingly smeared with homemade white butter by my mother. And she is still the same today. I love how she loves to feed us fresh, hot and bubbling food. In feeding she finds her contentment, I believe. And I find mine in eating. :-p

    It is not often that I use methi in my kitchen, despite it being so full of nutrition and my favourite. Laziness is the reason. It is hard work to sit and pluck out leaves for an hour and then to wash them. But I find it difficult to move away from those fresh bunches sitting with other greens in the grocery and therefore chuck a few bunches into my shopping cart with a big smile.


    Fenugreek leaves have a strong aromatic fragrance and flavour. Being a green vegetable, it is packed with variety of nutrients such as Iron and Folic Acid.

    Fenugreek leaves are dried and used later as kasoori methi powder, and sprinkled over a variety of Indian stir fry veggies and curries, especially daal makhni.

    This winter I got it for the first time and thought of making husband's favourite methi parathas, recipe courtesy my mother-in-law. It is a simple and fast breakfast option, given you have your fenugreek leaves plucked and washed and also the dough prepared beforehand.

    Here is what I do (after seeing how my mother-in-law makes it):

    Ingredients
    Methi leaves
    Flour
    Green chili chopped
    Salt & red chili powder to taste
    Water
    2-3 tbsp Ghee (melted)


    Method
    Mix all the ingredients with your hands. Add water slowly and carefully, and knead into a smooth dough that doesn't stick to your hand.


    Refrigerate for 1-2 hours. I find it easier to handle and work with the dough which has taken its time to set. After refrigerating, I believe, it is not so sticky and is easier to flatten out.

    Make small balls with the dough and start rolling it out in the shape you like.


    Shallow fry the rolled out paratha on a tawa.

    Serve hot and fresh with curd or achaar or pickle.


    Do try this and please let me know how you like this recipe through your sweet comments. I would love to read what you think.


    Wednesday, February 17, 2016

    Valentines Recipe: 4 Ingredient Mug Cake

    Nutella Mug Cake with just FOUR ingredients!

    February, the month of love holds a special place in the heart of each person who cares about his/her near and dear ones.

    Valentines' Day has become a festival of love, and not just romantic love. It is about celebrating a special bond be it any relationship, between a mother and her children or between siblings or friends.

    Now who doesn't like it when shown how much they are treasured by another person?

    Some of us express through roses, while others depend on cards, handwritten letters (yes, I am one of those).

    My husband showed me love this Feb 14th by bringing home my favourite rolls and churros in a shiny red box with a heart peep-through on it from Cinnabon, which makes the world's most delicious cinnamon rolls.


    What is a Cinnabon roll you might wonder and what is so special in it to go nuts about?

    Well, it is a soft bread roll made gooey layers filled with cream cheese and cinnamon (yes, dalchini) powder which is so delectable that it melts in your mouth when had warm. Yes I have a soft corner for warm desserts (gulab jamun, ice cream with warm walnut chocolate brownie are some of my other favourite warm sinful treats).


    I can never pass through a Cinnabon store in the mall without taking a deep breath of the sweet smell of cinnamon wafting. It leaves a smile on my face and cheers me up instantly making me want to go and buy a few of those tiny addictive rolls.

    Seeing the box from Cinnabon, my heart told my mind to chill, so what if the husband (M) came home late on Valentines' Day? So what if he didn't get roses or some precious gifts? So what if he didn't take you out for a dinner date to some fancy restaurant? And then in peace we ate the yummy little warm goodies full of sugar and cinnamon and cream cheese and crispy churros dipped in caramel frosting.


    I began my Valentines Day by taking a brisk walk along the corniche after seeing off M and Little M. Then after returning home I decided to make myself a mug cake using this no fuss recipe from The Comfort of Cooking, that required just 4, yes FOUR ingredients and 5 minutes of effort.

    If you love everything made from Nutella and everything topped with Nutella, just as I love all things Nutella, you must try this recipe.

    Recipe Type: Dessert
    Preparation Time: 5min
    Makes 1 mug cake

    Ingredients:
    1/4cup all-purpose flour
    1/4cup Nutella
    3tbsp milk
    1/4tsp baking powder

    Method

    1) Mix all ingredients in a microwave-safe mug or bowl.

    2) Whisk with a fork until smooth. Batter will be thick.

    3) Microwave on high for 1-1and a 1/2 min.

    4) Let it cool a bit but eat it wile its warm.

    5) Serve warm with strawberries or grapes or raisins.

    Tip:
    Insert a toothpick into the cake center. If it comes out clean, your cake is ready.


    It was the perfect mug cake I have made till now as I am not too much of a baker but love making and eating cakes. It was molten, soft, and totally melt in the mouth. I enjoyed it warm with my morning cup of tea.

    A perfect start to my Valentines.

    How did you celebrate your day of love with your loved ones

    Please don't leave without leaving your thoughts! I would love to read what you think.

    Tuesday, February 16, 2016

    Perfect Oats Porridge Breakfast

    Hello everyone! After much thought and counter thoughts I am finally launching my new blog. This is not my first blog that I am writing. I have another blog(now a private blog) where I write about anything and everything that catches my fancy. But not being a first time blogger doesn't make the butterflies in my stomach vanish. I am nervous but happy that things have fallen into place to help me get back to my first love - blogging.

    This blog will be mostly based on my experiments with food, new recipe ideas and inspiration. My cooking odyssey began after I got married (before my marriage I considered cooking as a headache and something requiring a lot of patience). I remember what disasters I used to (and still) create in the kitchen. Those disaster are worth a mention as a separate blog post after all, the mistakes we make help us improve and in hindsight make us laugh at our silliness as well. Skype helped a great deal in getting recipes and other cooking tips from my mother. I owe it my mother-in-law too who taught me the art of making the perfect parathas (Indian flatbread) (stuffed and simple) and chapattis during my vacation visits to Delhi in the first two years of my marriage. MIL's karela aloo sabzi with ambi (bitter gourd potato stir fry with raw mango) is to die for, something I would like to share on this blog soon!

    Looking back at these six years of happily feeding my family with healthy homemade food, I feel I have come a long way. Being a foodie, this passion for experimenting with food was fueled from my taste buds that demand variety every single day. This blog will have my memories eating food cooked lovingly by my mother and grandmothers, a few tidbits about my food disasters, many of my favourite traditional Punjabi recipes that are loved by my family and some experiments on different cuisines that I have luckily encountered living in the UAE which I believe has an international diaspora offering authentic cuisines from all around the world.

    Let me start this blog on a sweet note like we always do in India by eating dahi shakkar (curd and sugar) before starting anything important. A very simple fast breakfast option is this porridge.

    Do you or your kids love porridge like my family and I?

    Which ingredients are a must in your porridge?

    Please do share with me on whether you like your porridge to taste sweet or just prefer the raisins and fruits over sugar!

    This recipe is not a traditional Indian recipe but it very much akin to our humble dalia. In fact, I always combine 3/4th cup of oats with 1/4th cup of dalia when making this porridge. This porridge tastes amazing even when warm but I prefer the overnight version served cold with toppings of fresh fruit available in my fridge.

    I think what makes it even tastier is mild roasted taste of the grains which can be sauteed for a minute or two in butter before adding milk. I always put three times the amount milk to the oats and dalia combined. So its always 1 cup oats and dalia, and 3 cups of milk for us.


    The recipe makes 4-5 cups
    Cooking Time: 5 min
    Preparation Time: 5 min

    Ingredients

    3/4th cup oats (quick cooking)
    1/4th cup dalia
    4 tbsp butter
    Chopped fruits of your choice for topping
    2tbsp crushed almonds
    1tbsp sesame seeds
    2tbsp raisins
    5tbsp sugar


    1) Start by melting butter in a pressure cooker.

    2) Add oats and dalia, sauté it until you get the roasted fragrance.

    3) Add in sesame seeds and crushed almond, this is optional but I like to include it as it makes the porridge even more power-packed.
    Sauté for a minute.

    4) Pour in the milk while stirring continuously to avoid lumps.

    5) Bring to boil while stirring and then pressure cook until it starts to whistle.

    6) Turn of the gas. Let the steam escape from the pressure cooker.

    7) To serve hot, top with raisins and chopped almonds.

    8) To serve cold, let the porridge cool down completely and then put it in fridge for an hour or overnight. Chop fresh fruits just before serving and add to the refrigerated porridge.

    I used apple, strawberries and grapes but you can add sweet melon, bananas, pomegranate and pear too.

    Tips:
    I prefer keeping the peel on for apples and pears as it adds some crunch to the bites.

    Benefits of this recipe:
    • Quick and easy
    • Nutritious (high fibre, protein, and goodness of nuts, fruits and dry fruits)
    • Ideal Baby food (Please omit raisins and chopped fruits if you are planning to give to your infant. Instead you can can add powdered nuts and banana pieces)
    • Low on fat
    • Delicious and unique breakfast as opposed to the usual stuffed parathas.
    So what's stopping you from trying it? Go ahead!

    Also I would like to request you to please please please do let me know you thoughts and suggestions on this post and do not forget to follow and subscribe to my blog. Thank you so much for reading through!